Cái này đang thành trend Tiktok luôn rồi và bây giờ kiemtienspeed sẽ share cho mọi người nhé. Code này mình cũng tham khảo thôi:
1. Tạo code tỏ tình hình trái tim
Đầu tiêu, các bạn tạo thư mục mới và đặt tên cho thư mục này là “Heart” hoặc bạn cũng có thể đặt tên khác tuỳ theo sở thích của bạn.
Tiếp theo trong thư mục này, các bạn tạo file index.html và copy đoạn code dưới đây vào file đó.
<!DOCTYPE HTML PUBLIC "-//W3C//DTD HTML 4.0 Transitional//EN">
<TITLE> New Document </TITLE>
<META NAME="Generator" CONTENT="EditPlus">
<META NAME="Author" CONTENT="">
<META NAME="Keywords" CONTENT="">
<META NAME="Description" CONTENT="">
<canvas id="pinkboard"></canvas>
length: 500, // maximum amount of particles
duration: 2, // particle duration in sec
velocity: 100, // particle velocity in pixels/sec
effect: -0.75, // play with this for a nice effect
size: 30, // particle size in pixels
* RequestAnimationFrame polyfill by Erik Möller
(function(){var b=0;var c=["ms","moz","webkit","o"];for(var a=0;a<c.length&&!window.requestAnimationFrame;++a){window.requestAnimationFrame=window[c[a]+"RequestAnimationFrame"];window.cancelAnimationFrame=window[c[a]+"CancelAnimationFrame"]||window[c[a]+"CancelRequestAnimationFrame"]}if(!window.requestAnimationFrame){window.requestAnimationFrame=function(h,e){var d=new Date().getTime();var f=Math.max(0,16-(d-b));var g=window.setTimeout(function(){h(d+f)},f);b=d+f;return g}}if(!window.cancelAnimationFrame){window.cancelAnimationFrame=function(d){clearTimeout(d)}}}());
var Point = (function() {
this.x = (typeof x !== 'undefined') ? x : 0;
this.y = (typeof y !== 'undefined') ? y : 0;
Point.prototype.clone = function() {
return new Point(this.x, this.y);
Point.prototype.length = function(length) {
if (typeof length == 'undefined')
return Math.sqrt(this.x * this.x + this.y * this.y);
Point.prototype.normalize = function() {
var length = this.length();
var Particle = (function() {
this.position = new Point();
this.velocity = new Point();
this.acceleration = new Point();
Particle.prototype.initialize = function(x, y, dx, dy) {
this.acceleration.x = dx * settings.particles.effect;
this.acceleration.y = dy * settings.particles.effect;
Particle.prototype.update = function(deltaTime) {
this.position.x += this.velocity.x * deltaTime;
this.position.y += this.velocity.y * deltaTime;
this.velocity.x += this.acceleration.x * deltaTime;
this.velocity.y += this.acceleration.y * deltaTime;
Particle.prototype.draw = function(context, image) {
return (--t) * t * t + 1;
var size = image.width * ease(this.age / settings.particles.duration);
context.globalAlpha = 1 - this.age / settings.particles.duration;
context.drawImage(image, this.position.x - size / 2, this.position.y - size / 2, size, size);
var ParticlePool = (function() {
duration = settings.particles.duration;
function ParticlePool(length) {
// create and populate particle pool
particles = new Array(length);
for (var i = 0; i < particles.length; i++)
particles[i] = new Particle();
ParticlePool.prototype.add = function(x, y, dx, dy) {
particles[firstFree].initialize(x, y, dx, dy);
if (firstFree == particles.length) firstFree = 0;
if (firstActive == firstFree ) firstActive++;
if (firstActive == particles.length) firstActive = 0;
ParticlePool.prototype.update = function(deltaTime) {
// update active particles
if (firstActive < firstFree) {
for (i = firstActive; i < firstFree; i++)
particles[i].update(deltaTime);
if (firstFree < firstActive) {
for (i = firstActive; i < particles.length; i++)
particles[i].update(deltaTime);
for (i = 0; i < firstFree; i++)
particles[i].update(deltaTime);
// remove inactive particles
while (particles[firstActive].age >= duration && firstActive != firstFree) {
if (firstActive == particles.length) firstActive = 0;
ParticlePool.prototype.draw = function(context, image) {
if (firstActive < firstFree) {
for (i = firstActive; i < firstFree; i++)
particles[i].draw(context, image);
if (firstFree < firstActive) {
for (i = firstActive; i < particles.length; i++)
particles[i].draw(context, image);
for (i = 0; i < firstFree; i++)
particles[i].draw(context, image);
* Putting it all together
var context = canvas.getContext('2d'),
particles = new ParticlePool(settings.particles.length),
particleRate = settings.particles.length / settings.particles.duration, // particles/sec
// get point on heart with -PI <= t <= PI
function pointOnHeart(t) {
160 * Math.pow(Math.sin(t), 3),
130 * Math.cos(t) - 50 * Math.cos(2 * t) - 20 * Math.cos(3 * t) - 10 * Math.cos(4 * t) + 25
// creating the particle image using a dummy canvas
var image = (function() {
var canvas = document.createElement('canvas'),
context = canvas.getContext('2d');
canvas.width = settings.particles.size;
canvas.height = settings.particles.size;
// helper function to create the path
var point = pointOnHeart(t);
point.x = settings.particles.size / 2 + point.x * settings.particles.size / 350;
point.y = settings.particles.size / 2 - point.y * settings.particles.size / 350;
context.moveTo(point.x, point.y);
t += 0.01; // baby steps!
context.lineTo(point.x, point.y);
context.fillStyle = '#ea80b0';
image.src = canvas.toDataURL();
requestAnimationFrame(render);
var newTime = new Date().getTime() / 1000,
deltaTime = newTime - (time || newTime);
context.clearRect(0, 0, canvas.width, canvas.height);
var amount = particleRate * deltaTime;
for (var i = 0; i < amount; i++) {
var pos = pointOnHeart(Math.PI - 2 * Math.PI * Math.random());
var dir = pos.clone().length(settings.particles.velocity);
particles.add(canvas.width / 2 + pos.x, canvas.height / 2 - pos.y, dir.x, -dir.y);
// update and draw particles
particles.update(deltaTime);
particles.draw(context, image);
// handle (re-)sizing of the canvas
canvas.width = canvas.clientWidth;
canvas.height = canvas.clientHeight;
window.onresize = onResize;
// delay rendering bootstrap
})(document.getElementById('pinkboard'));
Và đây là cấu trúc thư mục cơ bản của dự án này.
Tiếp theo, mình sẽ hướng dẫn các bạn đưa code trái tim này lên web nhé.
2. Đưa code lên website bằng Github Page
Đầu tiên, các bạn tải và cài đặt Git tại đây. Tiếp theo là tạo tài khoản Github. Sau khi tạo tài khoản Github xong, các bạn tạo repo mới bằng cách nhấn vào “Create a new respository” ở trang chủ.
Đặt tên repo theo ý bạn nhưng phải nhớ chọn “Public” rồi nhấn “Create respositorưy”.
Quay trở lại máy tính, các bạn mở cmd tại thư mục Heart vừa tạo và gõ các lệnh git sau:
git remote add origin "URL của repo vừa tạo"
Thêm nội dung cho commit này bằng lệnh
git commit -m "nội dung bạn muốn"
Cuối cùng là đẩy repo này lên github bằng lệnh:
git push -u origin master
Quay lại trang github của repo và nhấn “Settings”.
Tiếp theo chọn “Pages”.
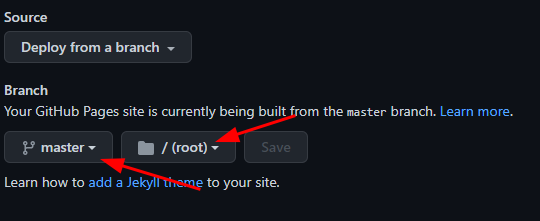
Trong Source, các bạn chọn “Deploy from a branch”.
Chọn branch là “master” và folder là “root”
Nếu thành công thì các bạn sẽ thấy URL của web xuất hiện ở dưới Github Pages.
Còn không thì các bạn vào Actions -> General và chọn như hình dưới. Sau đó thực hiện lại việc chọn Source.
Vậy là các bạn đã đẩy code lên website thành công rồi đó. Đem đi tỏ tình với crush thôi nào.
3. Code trái tim đập được của thủ khoa Lý
Để lấy code trái tim đập được, các bạn chỉ cần truy cập vào trang github này và tải file heartbeats.html về thôi nhé.
Ngoài ra, bạn cũng có thể sử dụng code tỏ tình cũng dễ thương không kém dành cho những bạn thích màu vàng
tại đây.
3. Share một số code trái tim khác đẹp không kém?
- Ý tưởng 1: Làm cho tim đập nhìn thật hơn:
Mình để ý thấy người ta hay làm tim đập theo 2 nhịp, rồi nghỉ, rồi tiếp 2 nhịp. Nên mình quyết định plot hàm nhịp tim đó ra, rồi tìm toạ độ đầu cuối của 1 interval chứa 2 nhịp sóng thôi. Sau đó xếp thời gian t lên cái interval đó, rồi cho t lặp đi lặp lại quanh 2 điểm. Mình nới interval ra một chút để có nhịp nghỉ, nếu t rơi vào vùng nới rộng này, thì gán R ở mức nhỏ nhất (trạng thái nghỉ).
- Ý tưởng 2:
Kết quả của ý tưởng 1 ra cũng ổn, nhưng nếu quan sát kĩ thì mình thấy nó không có cảm giác giãn nở. Lý do là vì mình chỉ tính toán trạng thái của trái tim và render các particles thoả mãn trạng thái đó, chứ không di chuyển tụi nó để tạo cảm giác giãn nở.
Ý tưởng bây giờ là thay vì tìm particles thoả mãn trạng thái hiện tại của trái tim, mình sẽ xác định 1 tập hợp particles ngay từ đầu của trạng thái nghỉ (lúc tim xẹp), sau đó di chuyển nó tới điểm mà đáng ra nó nên ở (lúc tim đang giãn).
Mình tìm khoảng cách từ mỗi particle đến lớp vỏ trái tim. Rồi cộng 1 đoạn vector có cùng hướng hiện tại của nó và có độ dài đúng bằng khoảng cách đó, để di chuyển nó tới lớp vỏ. Vậy là sẽ ra được kết quả có cảm giác co giãn hơn
Còn đây là repo của mình:


.jpg)